Tuesday, 5 June 2018

POPLITEAL CYST

INTRODUCTION

A popliteal cyst, also known as a Baker’s cyst, is a fluid-filled swelling that causes a lump at the back of the knee, leading to tightness and restricted movement. The cyst can be painful when you bend or extend your knee.It is named after the surgeon who first described it, William Morrant Baker (1838–1896). It is not a "true" cyst, as an open communication with the synovial sac is often maintained.

       Baker's cyst formstion         
        Baker's cyst formstion


CAUSES

Synovial fluid is a clear liquid that normally circulates through the cavities in your knee joint. Sometimes the knee produces too much of this fluid. The increasing pressure forces the fluid to the back of the knee via a one-way valve, where it creates a bulge. This severe swelling of the knee causes a popliteal cyst to form.
The most common causes of a popliteal cyst are:
  • Damage to the knee’s cartilage (meniscus)
  • Arthritis of the knee
  • Rheumatoid arthritis
  • Other knee conditions that causes joint inflammation
SYMPTOMS

You may not feel any pain with a popliteal cyst. In some cases, you may not notice it at all.
  • Mild to severe Knee pain
  • Knee Joint Stiffness
  • Limited range of motion
  • Swelling behind the knee and calf
  • Bruising on the knee and calf
  • Rupturing of the cyst
 Swelling in affected leg
   Swelling in affected leg

DIAGNOSIS :

Your doctor will examine your knee and feel the swelling. If the cyst is small, they may compare the affected knee to the healthy one and check your range of motion.A Baker's cyst is easier to see from behind with the patient standing with knees fully extended. It is most easily palpated (felt) with the knee partially flexed.

Your doctor may recommend noninvasive imaging tests if the cyst rapidly increases in size or causes severe pain or fever. These tests include an MRI or ultrasound. An MRI will enable your doctor to see the cyst clearly and to determine if you have any damage to the cartilage.
Diagnosis is confirmed by ultrasonography.


              MRI


TREATMENT

A popliteal cyst often doesn’t need treatment and will go away on its own. However, if the swelling becomes large and causes severe pain, your doctor may recommend one of the following treatments.

                          
                             Knee Compression for rest

Fluid draining

Your doctor will insert a needle into the knee joint and may use an ultrasound to help guide the needle to the correct place. They’ll then draw the fluid from the joint.

Physiotherapy treatment :
  • Avoiding activities such as squatting, kneeling, heavy lifting, climbing, and even running can help prevent pain
  • Regular, gentle exercises may help increase your range of motion and strengthen the muscles around your knee.
                    Knee bending exercise          
                     Knee bending exercise
  • Stretching of hamstring muscle and Strengthening of the quadriceps and/or the patellar ligament.


                                                 qudricepes strengthening exercise


  • Crutches may help alleviate the pain.
  • You can also help reduce pain by using a compression wrap or placing ice on the joint.

                     Ice therapy  
                                ice therapy
  • Ultrasound therapy on the back of knee joint.
  • Interferential Therapy (IFT) also useful in relieving pain.
Medical Treatment :

Your doctor may recommend a Pain relieving medicine mainly NSAIDs are useful, such as Aceclofenac / Diclofenac. 

Your doctor will also inject this drug into the joint, and the medication will flow back into the cyst if medicine are not effective. Though it may help relieve the pain, it doesn’t always prevent a popliteal cyst from recurring.

Treating the cause of the cyst is very important to prevent the cyst from returning. As a general rule, if the cyst is left alone, it’ll go away once the underlying cause is treated. Should your doctor determine that you have damage to the cartilage, they may recommend surgery to repair or remove it.

                                                 
                           surgical treatment

If you have osteoarthritis of knee , the cyst may persist even after your doctor treats the underlying cause. If the cyst causes you pain and limits your range of motion, your doctor might recommend surgery to remove it.

COMPLICATIONS

Complications associated with popliteal cysts. Complications are rare, but they may include:
  • prolonged swelling
  • severe pain
  • complications from related injuries, such as torn cartilage
  • the calf region may become red
  • there may be a sensation of water trickling down the calf

AMPUTATION

INTRODUCTION:

Amputation is the surgical removal of all or part of a limb or extremity such as an arm, leg, foot, hand, toe, or finger. 

It is done by trauma, prolonged constriction, or by surgical procedure. As a surgical procedure is require to control pain or a disease process in the affected limb, such as malignancy or gangrene. 

In some cases, it is carried out on individuals as a preventative surgery for such problems. A special case is that of congenital amputation, a congenital disorder, where fetal limbs have been cut off by constrictive bands. 

In some underdeveloped countries, where amputation of the hands, feet or other body parts is or was used as a form of punishment for people who committed crimes. Amputation of the leg -- either above or below the knee joint-- is the most common amputation surgery.

After Amputation proper prosthesis selection and exercise helps you to walk again.


What are the Causes of Amputation?

There are many reasons an amputation may be necessary. The most common is poor circulation because of damage or narrowing of the arteries, called peripheral arterial disease. Without adequate blood flow, the body's cells cannot get oxygen and nutrients they need from the bloodstream. As a result, the affected tissue begins to die and infection may set in.

Circulatory disorders

Diabetic foot infection or gangrene (the most frequent reason for infection-related amputations)
Sepsis with peripheral necrosis

Neoplasm

Transfemoral amputation due to liposarcoma
Cancerous bone or soft tissue tumors (e.g. osteosarcoma, chondrosarcoma, fibrosarcoma, epithelioid sarcoma, Ewing's sarcoma, synovial sarcoma)
Melanoma

Trauma

Three fingers from a soldier's right hand were traumatically amputated during World War I.
Severe limb injuries in which the limb cannot be saved or efforts to save the limb fail.
Traumatic amputation (an unexpected amputation that occurs at the scene of an accident, where the limb is partially or entirely severed as a direct result of the accident, for example, a finger that is severed from the blade of a table saw)
Amputation in utero (Amniotic band)

Deformities

Deformities of digits and/or limbs (e.g., proximal femoral focal deficiency, Fibular hemimelia)
Extra digits and/or limbs (e.g., polydactyly)

Infection

Bone infection (osteomyelitis)
Diabetes
Frostbite

Athletic performance

Sometimes professional athletes may choose to have a non-essential digit amputated to relieve chronic pain and impaired performance. Australian Rules footballer Daniel Chick elected to have his left ring finger amputated as chronic pain and injury was limiting his performance. Rugby union player Jone Tawake also had a finger removed. National Football League safety Ronnie Lott had the tip of his little finger removed after it was damaged in the 1985 NFL season.

Legal punishment

Amputation is used as a legal punishment in a number of countries, among them Saudi Arabia, Yemen, United Arab Emirates, Iran, Sudan, and Islamic regions of Nigeria.


LEVEL OF AMPUTATION :

                    
                         Level of amputation

Upper Limb
  • Forequarter
  • Shoulder Disarticulation SD
  • Transhumberal (Above Elbow AE)
  • Elbos Disarticulation ED
  • Transradial (Below Elbow BE)
  • Hand/ Wrist Disarticulation
  • Transcarpal (Partial Hand PH)
Lower Limb
  • Hemipelvectomy
  • Hip Disarticulation HP
  • Transfemoral TF (Above Knee AK)
  • Knee Disarticulation KD
  • Transtibial TT (Below Knee BK)
  • Ankle Disarticulation
  • Symes
  • Partial Foot PF (Chopart)

PROCEDURE OF AMPUTATION:

The first step is ligating the supplying artery and vein, to prevent hemorrhage (bleeding). The muscles are transected, and finally, the bone is sawed through with an oscillating saw. Sharp and rough edges of the bone are filed down, skin and muscle flaps are then transposed over the stump, occasionally with the insertion of elements to attach a prosthesis.

Distal stabilisation of muscles is recommended. This allows effective muscle contraction which reduces atrophy, allows functional use of the stump and maintains soft tissue coverage of the remnant bone. The preferred stabilisation technique is myodesis where the muscle is attached to the bone or its periostium. In joint disarticulation amputations tenodesis may be used where the muscle tendon is attached to the bone. Muscles should be attached under similar tension to normal physiological conditions.

Ideal stump

skin flaps: skin should be mobile, sensation intact, no scars
muscles are divided 3 to 5 cm distal to the level of bone resection
nerves are gently pulled and cut cleanly, so that they retract well proximal to the bone level to reduce the complication of neuroma

Location of pulses
  1. Femoral Triangle
  2. Foot pulse (Medial malleolus or dorsum of the foot)
  3. Popliteal (behind the knee)
  4. Femoral (within the femoral triangle)
  5. If a leg has been amputated because of gangrene, the remaining leg is examined for a pulse
The surgeon may choose to close the wound right away by sewing the skin flaps which called as closed amputation. Or the surgeon may leave the site open for several days in case there's a need to remove additional tissue.
The surgical team then places a sterile dressing on the wound and may place a stocking over the stump to hold drainage tubes or bandages. The doctor may place the limb in traction, in which a device holds it in position, or may use a splint.


SPECIAL INVESTIGATION


Doppler ultrasound

X-rays
CT scan
Angiogram (outlines blood vessels)
Doppler ultrasound (occlusion of vessels)
Venogram and arteriogram
Radioactive dye injected into the blood


MANAGEMENT

Pre-Operative Management:

If the patient has problems with phantom pain (a sense of pain in the amputated limb) or grief over the lost limb, the doctor will prescribe medication and/or counseling, as necessary.
Physiotherapy, beginning with gentle stretching exercises, often begins soon after surgery. Practice with the artificial limb may begin as soon as 10 to 14 days after surgery.


Physiotherapy Treatment:

Burger's Exercise
Stimulates collateral blood flow in the patient’s leg
It is performed for 20 min.
The leg is elevated until the toes go white, then lowered, then level
Repeat 2-3 times to improve collateral circulation


              Burger's exercise

Post-Oparative Management
  • Connective tissue massage
    - Efflurage
    - Rolling
    - It relieves tightness and loosen the muscles
  • Dynamic stump exercises

Stump exercise


exercise

  • Balance and gait retraining
    - Improve static and dynamic balance
  • Strengthening exercise of Bilateral lower limb and also upper limb muscles
    - Use Parallel bars, walking frame then Crutches (in that order)
    - Physiotherapist stands on the amp side, using a belt around the patient’s waist to support
    - Rest if the patient feels tired
  • Maintain function in the remaining leg and stump to maintain peripheral circulation
  • Maintain respiratory function (important with smokers and those patients under general anaesthesia)
Stump Care


Stump care
  • For hygiene and skin care see handout on amputations
  • A hip flexion Contracture may develop because of elevation to reduce swelling
  • Stump bandaging is done to ‘cone’ the stump, thereby preventing oedema, which occurs because there is no muscle pump and the stump hangs
  • Swelling must be prevented to allow proper attachment of the Prosthesis, and the prevention of Pressure sores
  • The stump sock is put on first, then the prosthesis
  • The prosthesis must be cleaned and maintained (Children who are still growing, grow out of their prostheses)
Mobility Aids

The choice of mobility aids depends on the level of fitness, strength, balance skills of the individual:
  • Walking frame
  • Axillary crutches
  • Elbow crutches
  • Walking stick

Walking Stick
  • For bilateral lower limb amputees a wheelchair is indicated (high energy expenditure during gait with prostheses)

ARTIFICIAL LIMB(Prosthesis)

If you are looking for Physiotherapy service after Amputation you can contact us.

Osteomalacia

What is a Osteomalacia?

Osteomalacia is the softening of the bones caused by impaired bone metabolism primarily due to inadequate levels of available phosphate, calcium, and vitamin D, or because of resorption of calcium. The impairment of bone metabolism causes inadequate bone mineralization.

Vitamin D and calcium supplements are measures that can be used to prevent and treat osteomalacia. Vitamin D should always be administered in conjunction with calcium supplementation (as the pair work together in the body) since most of the consequences of vitamin D deficiency are a result of impaired mineral ion homeostasis.

Vitamin D also helps maintain calcium and phosphate levels so your bones form properly. It’s made within the skin from exposure to ultraviolet (UV) rays in sunlight. It can also be absorbed from foods like dairy products and fish.

Causes of Osteomalacia

The most common cause of osteomalacia is a deficiency of vitamin D, which is normally derived from sunlight exposure and, to a lesser extent, from the diet. The most specific screening test for vitamin D deficiency in otherwise healthy individuals is a serum 25(OH)D level. Less common causes of osteomalacia can include hereditary deficiencies of vitamin D or phosphate (which would typically be identified in childhood) or malignancy.

The causes of adult osteomalacia are varied, but ultimately result in a vitamin D deficiency:
  • Insufficient nutritional quantities or faulty metabolism of vitamin D or phosphorus
  • Renal tubular acidosis
  • Malnutrition during pregnancy
  • Malabsorption syndrome
  • Hypophosphatemia
  • Chronic kidney failure
  • Tumor-induced osteomalacia (Oncogenic osteomalacia)
  • Long-term anticonvulsant therapy
  • Celiac disease
  • Cadmium poisoning, itai-itai disease
You may also have a problem absorbing vitamin D or breaking down food to release it if you’ve had surgery to remove parts of your stomach or small intestine.
Certain conditions can interfere with the absorption of vitamin D:
Celiac disease can damage the lining of your intestines and prevent the absorption of key nutrients like vitamin D.
Certain types of cancer can interfere with vitamin D processing.
Kidney and liver disorders can affect the metabolism of vitamin D.

SIGNS & SYMPTOMS
  • Diffuse joint and bone pain (especially of spine, pelvis, and legs)
  • Muscle weakness
  • Difficulty walking, often with waddling gait
  • Hypocalcemia
  • Compressed vertebrae and diminished stature
  • Pelvic flattening
  • Weak, soft bones
  • Easy fracturing
  • Bending of bones
                  
                  Bow Leg Deformity 

DIAGNOSIS

Biochemical findings
Biochemical features are similar to those of rickets. The major factor is an abnormally low vitamin D concentration in blood serum. Major typical biochemical findings include:
  • Low serum and urinary calcium
  • Low serum phosphate, except in cases of renal osteodystrophy
  • Elevated serum alkaline phosphatase (due to an increase in compensatory osteoblast activity)
  • Elevated parathyroid hormone (due to low calcium)
Radiographic characteristics
Radiological appearances include:

                
                 psedofracture
  • Pseudofractures, also called Looser's zones.
  • Protrusio acetabuli, a hip joint disorder
DIFFERENTIAL DIAGNOSIS

Fibromyalgia
Rheumatic diseases
Muscular Dystrophy

TREATMENT

Medical treatment

If your doctor detects osteomalacia early, you may only need to take oral supplements of vitamin D, calcium, or phosphate.Foods with vitamin D include:

                   
                   vitamin D foods
  • Cereal
  • Cheese
  • Eggs
  • Fish (tuna, salmon, swordfish, sardines)
  • Liver
  • Milk
  • Orange juice (fortified with vitamin D)
  • Yogurt

You may also need treatment if you have other underlying conditions that affect vitamin D metabolism. You need treatment for cirrhosis and kidney failure to reduce osteomalacia.ou may need to spend some time outdoors in sunlight so your body can make enough vitamin D in your skin.To treat broken or deformed bones from osteomalacia, your doctor may give you a brace to wear. If the problem is severe, you may need surgery.

Supplimentation Recomendations

Amounts vary depending on cause of deficiency, severity, and physician preference of ramping dosage
Supplement dosages range from 800 to 1000 IU/d of vitamin D
Or less than 2000 IU/d to avoid toxicity for those 1 year and older

Physiotherapy Treatment

There are no direct physiotherapy therapy interventions for osteomalacia. Patient will be referred to physical therapy for treatment of impairments that may be a cause of vitamin D deficiency such as decline in muscle strength, decline in physical functioning, or falls prevention. Exercises are like -
  • Muscle strengthening exercise
  • Encourage patient for doing his/her activities by own
  • Teach proper techniques to prevent falls and fracture
  • Counselling of patient - to prevent/relieve depression, it is rare
  • Ice Therapy for pain relief.
PREVENTION

Prevention of osteomalacia rests on having an adequate intake of vitamin D and calcium. Vitamin D3 Supplementation is often needed due to the scarcity of Vitamin D sources in the modern diet. Treat your underlying conditions like kidney failure properly.Talk to your doctor to create a perfect treatment plan.

Sunday, 3 June 2018

Fibrous Dysplasia

DISCRIPTION

Fibrous dysplasia is a disorder where normal bone and marrow is replaced with fibrous tissue, resulting in formation of bone that is weak and prone to expansion. As a result, most complications result from fracture, deformity, functional impairment, and pain.

Disease can affect one bone (monostotic) or multiple (polyostotic). Single bone involvement usually occurs in adolescents and young adults. People who have more than one affected bone typically develop symptoms before the age of 10.                                                                                                            
   
Multiple fibrous dysplasia

Although fibrous dysplasia is a genetic disorder, it's caused by a gene mutation that's not passed from parent to child. There's no cure for the disorder. Treatment, which may include surgery, focuses on relieving pain and repairing or stabilizing bones.
Fibrous dysplasia is a mosaic disease that can involve any part or combination of the craniofacial, axillary, and/or appendicular skeleton. The type and severity of the complications therefore depend on the location and extent of the affected skeleton. The clinical spectrum is very broad, ranging from an isolated, asymptomatic monostotic lesion discovered incidentally, to severe disabling disease involving practically the entire skeleton and leading to loss of vision, hearing, and mobility.

   
craniofacial dysplasia

PATHOPHYSIOLOGY

Fibrous dysplasia is a mosaic disease resulting from post-zygotic activating mutations of the GNAS locus at 20q13.2-q13.3, which codes for the a subunit of the Gs G-coupled protein receptor. In bone, constitutive Gsa signaling results in impaired differentiation and proliferation of bone marrow stromal cells. Proliferation of these cells causes replacement of normal bone and marrow with fibrous tissue. The bony trabeculae are abnormally thin and irregular, and often likened to Chinese characters (bony spicules on biopsy).
Fibrous dysplasia is not hereditary, and there has never been a case of transmission from parent to child.

CAUSES

Fibrous dysplasia is linked to a gene mutation present in certain cells that produce bone. The mutation results in the production of immature and irregular bone tissue. Most often the irregular bone tissue (lesion) is present at a single site on one bone. Less often multiple bones are affected, and there may be more than one lesion on multiple bones.
A lesion usually stops growing sometime during puberty. However, lesions may grow again during pregnancy.
The gene mutation associated with fibrous dysplasia occurs after conception, in the early stages of fetal development. Therefore, the mutation isn't inherited from your parents, and you can't pass it on to your children.

SYMPTOMS

Fibrous dysplasia may cause few or no signs and symptoms, particularly if the condition is mild. More severe fibrous dysplasia may cause:
  • Bone pain, usually a mild to moderate dull ache
  • Swelling
  • Bone deformity
  • Bone fractures, particularly in the arms or legs
  • Curvature of leg bones
Fibrous dysplasia can affect any bone in the body, but the most commonly affected bones include the following:
  • Femur
  • Tibia
  • Humerus
  • Skull
  • Ribs
  • Pelvis
Rarely, fibrous dysplasia may be associated with a syndrome that affects the hormone-producing glands of your endocrine system. These abnormalities may include:
  • Very early puberty
  • Overactive hormone production
  • Light brown spots on the skin
Increased bone pain also may be associated with the normal hormonal changes of the menstrual cycle or pregnancy.

DIGNOSIS
  • X-Ray - Bubbly lytic lesion / Ground glass Imaging tests.

GROUND GLASS APPEARANCE
  • Computerized tomography or magnetic resonance imaging scans may be used to determine how extensively your bones are affected.
  
  CT Scan


  • Bone scan uses radioactive tracers, which are injected into your bloodstream. The damaged parts of your bones take up more of the tracers, which show up more brightly on the scan.
  • Biopsy uses a hollow needle to remove a small piece of the affected bone for laboratory analysis.
COMPLICATION

Severe fibrous dysplasia can cause:
  1. Bone deformity or fracture - The weakened area of an affected bone can cause the bone to bend. These weakened bones also are more likely to fracture.
 
Tibial Bowning(deformity)
  1. Vision and hearing loss - The nerves to your eyes and ears may be surrounded by affected bone. Severe deformity of facial bones can lead to loss of vision and hearing, but it's a rare complication.
  2. Arthritis - If leg and pelvic bones are deformed, arthritis may form in the joints of those bones.
  3. Cancer - Rarely, an affected area of bone can become cancerous. This rare complication usually only affects people who have had prior radiation therapy.
TREATMENT

Nonsurgical Treatment
  1. Medications
    Bisphosphonates are medications that decrease the activity of cells that dissolve bone. They have recently become available in easy-to-take pill form. These medications have not yet been used extensively in the treatment of fibrous dysplasia; however, early studies have shown effective relief of the pain associated with the disorder.
  2. Bracing
    In some cases, bracing may be used to prevent fracture in weakened bones. However, bracing has not been shown to be effective in preventing progression of deformity.
Surgical Treatment

In patients with fibrous dysplasia, surgery is often necessary to remove a growth or to fix or prevent bone fractures
  1. Curettage - Curettage is a surgical procedure commonly used to treat fibrous dysplasia. In curettage, the tumor is scraped out of the bone.
  2. Bone graft - After curettage, the doctor may fill the cavity with a bone graft to help stabilize the bone.
  3. Internal fixation - Metal rods or plates and screws may be used to fix a fracture or deformity, prevent bone breakage before it occurs, or stabilize the bone.
   
      TREATMENT OF FD


 After surgery

Physiotherapy Treatment
  • Weight Bearing exercise like close kinetic chain exercise for affected part
  • Strengthening exercise for surrounding muscles
Post-oprative treatment
  • Councelling to reduce stress
  • Relaxaion exercise like Breathing Exercise
  • Passive ROM Exercise
  • Muscle stregthening exercise
  • Execise for prevetion of arthritis
  • Ice Pack to reduce swelling

Saturday, 2 June 2018

Williams flexion exercises (WFE)

What is a Williams Flexion Exercises?
Williams flexion exercise (WFE)


Williams flexion exercises (WFE) — also called Williams lumbar flexion exercises or simply Williams exercises — are a set or system of related physical exercises intended to enhance lumbar flexion, avoid lumbar extension, and strengthen the abdominal and gluteal musculature in an effort to manage low back pain non-surgically. It also stretches the erector spinae, hamstring, and tensor fasciae latae muscles and iliofemoral ligament. The system was first devised in 1937 by Dr. Paul C. Williams, then a Dallas orthopedic surgeon.

History:

The WFEs were developed out of the Regen exercise (also called “squat exercise”), advocated in the 1930s by Eugene M. Regen, a Tennessee orthopedic surgeon, and which consist in squatting and emphasizing the convexity of the lumbar area. Williams first published his own modified exercise program in 1937 for patients with chronic low back pain in response to his clinical observation that the majority of patients who experienced low back pain had degenerative vertebrae secondary to degenerative disk disease. These exercises were initially developed for men under 50 and women under 40 who had exaggerated lumbar lordosis, whose x-ray films showed decreased disc space between lumbar spine segments (L1-S1), and whose symptoms were chronic, but low grade.


RATIONALE :

Williams believed that the basic cause of all low Back pain is the stress induced on the inter-vertebral disc by poor posture. He theorized that the lordotic lumbar spine placed inordinate strain on the posterior elements of the inter-vertebral disc and caused its premature dysfunction. He was concerned about the lack of flexion in daily activities in the accumulation of extension forces that hurt the disc.


Goals of Williams flexion exercise (WFE):

The goals of these exercises are to open the intravertebral foramina and stretch the back extensors, hip flexors, and facets; to strengthen the abdominal and gluteal muscles; and to mobilize the lumbosacral junctions. And also reduce low Back pain and provide lower trunk stability.

Mechanism of Williams lumbar flexion exercises :

Williams said: "The exercises outlined will accomplish a proper balance between the flexor and the extensor groups of postural muscles...". Williams suggested that a posterior pelvic-tilt position was necessary to obtain best results.
Both flexion and extension exercises have been shown to help reduce back pain and has been demonstrated to accomplish the following: 
  • a) significantly increase the canal area
  • b) increase the midsagittal diameter
  • c) increase the subarticular sagittal diameter
  • d) increase all the foraminal dimensions significantly.

Procedure of Williams lumbar flexion exercises

These exercises were performed in the supine position on a floor or other flat surface. There were variations, but the primary maneuver is to grab the legs and pull the knees up to the chest and hold them there for several seconds. The patient then relaxes, drops the legs down and repeats the exercise again. The primary benefit is supposed to be the opening of the intervertebral foramen, the stretching of ligmentous structures, and the distraction of the apophyseal joints.

Seven of the variations of the 
Williams lumbar flexion exercises (WFEs) are outlined below :
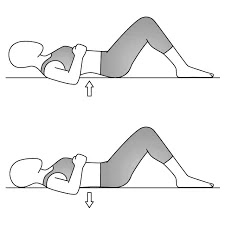
  1. Pelvic tilt - Lie on your back with knees bent, feet flat on floor. Flatten the small of your back against the floor, without pushing down with the legs. Hold for 5 to 10 seconds. Pelvic tilt exercises strengthen muscles that support your low back.                                                                                                       
    PELVIC TILT

                                                                                                              
  2. Single Knee to chest - Lie on your back with knees bent and feet flat on the floor. Slowly pull your right knee toward your shoulder and hold 5 to 10 seconds. Lower the knee and repeat with the otherthe other knee.                                                                                                                                                                                                                                        
    Knee to chest stretch
    Knee to chest stretch

                                                                                     
  3. Double knee to chest - Begin as in the previous exercise. After pulling right knee to chest, pull left knee to chest and hold both knees for 5 to 10 seconds. Slowly lower one leg at a time. Knee to chest stretches improve flexibility in your low back.                                                                                                                                                                                                              Double knee to chest exercise                                                                               Double knee chest                                                                                                                   
  4. Partial sit-up - Do the pelvic tilt (exercise 1) and, while holding this position, slowly curl your head and shoulders off the floor. Hold briefly. Return slowly to the starting position. Partial sit-ups strengthen the upper and lower abdominal muscles at the same time. 
    Partial sit-up

  5. Hamstring stretch - Start in long sitting with toes directed toward the ceiling and knees fully extended. Slowly lower the trunk forward over the legs, keeping knees extended, arms outstretched over the legs, and eyes focus ahead. The hamstring stretch improves flexibility of the muscles along the back of your thighs.           
    hamstring stretch
    hamstring stretch

                               
  6. Hip Flexor stretch - Place one foot in front of the other with the left (front) knee flexed and the right (back) knee held rigidly straight. Flex forward through the trunk until the left knee contacts the axillary fold (arm pit region). Repeat with right leg forward and left leg back. The hip flexor muscles are located at the front of your hips. These muscles are often tight, particularly if you sit a lot during the day. It improves hip flexibility.                                                                                                 
    Hip Flexor Stretch
    Hip Flexor Stretch

  1. Squat - Stand with both feet parallel, about shoulder's width apart. Attempting to maintain the trunk as perpendicular as possible to the floor, eyes focused ahead, and feet flat on the floor, the subject slowly lowers his body by flexing his knees. The squat exercise strengthens muscles in your hips. Perform this exercise near a sturdy surface if you have difficulty with your balance.           
    Squat

    Squat


Wednesday, 30 May 2018

McKenzie Method : Low Back Extension Exercise

 McKenzie Method INTODUCTION :

Many people spend long periods of time in a seated position. Being seated promotes a flexed spinal posture which, according to back expert and author Stuart McGill, can cause intervertebral discs to bulge outwards resulting in pain and inhibited spinal extension. McKenzie’s exercise series is designed to encourage the displaced disc to move back into its correct position which will alleviate the pain and allow freer spinal movement.

The McKenzie method is a classification system and a classification-based treatment for patients with low back pain. A acronym for the McKenzie method is mechanical diagnosis and therapy (MTD). The McKenzie method was developed in 1981 by Robin McKenzie, a physical therapist from New Zealand.

The aims of the therapy are: reducing pain, centralization of symptoms (symptoms migrating into the middle line of the body) and the complete recovery of pain. The prevention step consists of educating and encouraging the patient to exercise regularly and self-care.

CLASSIFICATION :

Posture syndrome :
Refers to pain which occurs due to a mechanical deformation of normal soft tissue from prolonged end range loading of periarticular structures.

Dysfunction syndrome :

Refers to pain which is a result of mechanical deformation of structurally impaired tissues like scar tissue or adhered or adaptively shortened tissue.

Derangement syndrome :

Refers to pain which is caused by a disturbance in the normal resting position of the affected joint surfaces.

This syndrome is classified in two groups :

Irreducible derangement
The criteria for derangement are present.
No strategy is capable to produce a permanent change in symptoms.
Reducible derangement
Shows one direction of repeated movement which decreases or centralizes referred symptoms / preferred direction.

Other or non-mechanical syndrome
  • Spinal Canal stenosis
  • Hip disorders
  • Sacroiliac disorders
  • Low back pain in pregnancy
  • Spondylolysis and spondylolisthesis
SIGNIFICANCE :

McKenzie’s exercises are designed to reposition any displaced intervertebral discs. This is initially done by using gravity to draw the discs back into the spine and then actively to consolidate the effect of gravity. 

To facilitate disc movement, you must relax as much as possible when performing the exercises and maintain relaxed and even breathing for the duration of the exercise. McKenzie’s exercises can be categorized as either passive or active and the passive exercises should always be performed first.

STAGES OF EXERCISE :

1. Lying Prone Back Exercise :
The patient takes place at the treatment table in prone position. The arms have to be parallel with the thorax, with the hands next to the pelvis. The head is turned to one side. This position creates automatically a lordosis of the lumbar spine. Although this position may be painful, the pain does not indicate the procedure is undesirable if it is felt centrally.
Patients with posterior derangement should be careful when arising from the position to standing. It is important that, while arising, the restored lordosis is maintained.
In any kind of derangement it is important to perform the exercise long enough (5-10 minutes) for the fluid to alter its position anteriorly.
For example patients with lumbar kyfosis, it is possible that the patients cannot tolerate the prone position unless they are lying over a few pillows.
    Low Back Prone Lying exercise
prone lying Back Exercise

2. Extension in Prone Lying :

The patient lies on his abdomen while the hands are placed near the shoulders. The hands are placed with the palms down. Now the patient makes a press-up movement with straight arms. The Pelvis stays near the table while the patient presses the thorax upwards. After this movement the patient returns to his starting position and repeats this exercise 10 times.
The aim of this exercise is to make the lumbar spine relax after the maximum extension, in the relaxation phase.
It is possible that there occurs central low back pain described as a strain pain, but it will gradually wear off.
This procedure is the most important and effective in the treatment of derangement as well as extension dysfunction.

Extension in Prone Lying exercise
extension on elbow


 extention on hand

       extention on hand


3. Standing Lumbar Extension :

The patient stands up straight with his feet apart, to remain a stable position. The hands are placed on the lumbar region, in the area of the spina iliaca posterior superior. His hands fixate the pelvis while the patient leans backwards. The patient has to lean backwards as far as possible.
It is used mainly in preventing future back problems once your acute pain has resolved. It can also be used as an alternative to prone press ups if social situations don't allow you to lie flat on the floor and exercise, but you need to extend your spine to manage your back pain.
extension in standing


4. The Flexion Rotation Exercise for Low Back Pain :

To do the exercise, lie on your side (typically on the side with the most pain), and bend your knees. Straighten your bottom leg, and tuck your top foot behind your bottom knee. Slowly reach your upper hand to your shoulder blade, and rotate your spine by moving your top shoulder back and towards the floor. Repeat the exercise for 10 repetitions.
If you have tried the press up with hips off center and the standing side glide exercise and are still having symptoms, you may want to move on to the flexion rotation stretch for low back pain. This stretch can be done to treat back pain on one side or pain that is traveling down your leg.

Self-treatment exercises :

Rest position for cold pack
Sphinx-movement
standing back extension
Pelvic side shift
This exercise is called a “mirror exercise” and can be helpful when you have a “blocked” back and you’re leaning to one side because of it. The patient has to lean with his upper body against the wall, while his feet take same distance from the wall. Now the patient has to move his pelvis against the wall and back to the beginning position. This exercise has to be repeated 8-10 times.

McKenzie Method Exercise
Other Related Article :

williams flexion exercises


Proprioceptive Neuromuscular Facilitation (PNF) Technique :

INTRODUCTION OF PNF Technique :

      
Proprioceptive Neuromuscular Facilitation (PNF)  Technique
PNF Training 

Flexibility is key for athletes and nonathletes alike. It allows you to move freely and comfortably in your daily life, and can also help prevent injury during exercise. One of the best ways to increase your flexibility is by stretching. However, research suggests that not all stretching techniques are created equal. Proprioceptive neuromuscular facilitation (PNF) stretching relies on reflexes to produce deeper stretches that increase flexibility.

Proprioceptive Neuromuscular Facilitation (PNF) is a more advanced form of flexibility training that involves both the stretching and contraction of the muscle group being targeted.

According to the International PNF Association, PNF stretching was developed by Dr. Herman Kabat in the 1940s as a means to treat neuromuscular conditions including polio and multiple sclerosis.

PNF stretching was originally developed as a form of rehabilitation, and to that effect it is very effective. It is also excellent for targeting specific muscle groups, and as well as increasing flexibility, it also improves muscular strength.


PRECAUTION

Certain precautions need to be taken when performing PNF stretches as they can put added stress on the targeted muscle group, which can increase the risk of soft tissue injury. To help reduce this risk, it is important to include a conditioning phase before a maximum, or intense effort is used.

Also, before undertaking any form of stretching it is vitally important that a thorough warm up be completed. Warming up prior to stretching does a number of beneficial things, but primarily its purpose is to prepare the body and mind for more strenuous activity. One of the ways it achieves this is by helping to increase the body’s core temperature while also increasing the body’s muscle temperature. This is essential to ensure the maximum benefit is gained from your stretching. Click here for a detailed explanation of how, why and when to perform your warm up.


EFFECT OF PNF

While there are multiple PNF stretching techniques, all of them rely on stretching a muscle to its limit. Doing this triggers the inverse myotatic reflex, a protective reflex that calms the muscle to prevent injury.
“PNF causes the brain to go ‘I don’t want that muscle to tear’ and sends a message to let the muscle relax a little more than it would normally,” says fasciologist Ashley Black.
PNF is a stretching technique utilized to increase ROM and flexibility. PNF increases ROM by increasing the length of the muscle and increasing neuromuscular efficiency.


PNF TECHNIQUES :

      
PNF Techniques Overview


Revarsal of Antagonists: A group of techniques that allow for agonist contraction followed by antagonist contraction without pause or relaxation.

  • Dynamic Reversals (Slow Reversals): Utilizes isotonic contractions of first agonists, then antagonists performed against resisitance . Contraction of stronger pattern is selected first with progression to weaker pattern. The limb is moved through full range of motion.
      Indications: Impaired strength and coordination between agonist and antagonist, limitations in             range of motion, fatigue.
  • Stabilizing Reversals: Utilizes alternating isotonic contractions of first agonists, then antagonists against resistance, allowing only very limited range of motion.
       Indications: Impaired strength, stability and balance, coordination.

Rhythmic Stabilization (RS): Utilizes alternating isometric contractions of first agonists, then antagonists against resistance; no motion is allowed .
Indications Impaired strength and coordination, limitations in ROM; impaired stabilization control and balance.

Repeated Contractions, RC (Repeated stretch): Repeated isotonic contractions from the lengthened range, induced by quick stretches and enhanced by resistance; performed through the range or part of range at a point of weakness. Technique is repeated (i.e.,three or four stretches) during one pattern or until contraction weakens.
Indications Impaired strength, initiation of movement, fatigue and limitation in active ROM.

Rhythmic Initiation (RI): Voluntary relaxation followed by passive movements progressing to active assisted and active resisted movements to finally active movements. Verbal commands are used to set the speed and rhythem of the movements. Light tracking is used during the resistive phase to facilitate movement.
Indications Inability to relax, hypertonicity (spasticity, rigidity); difficulty initiating movement; motor planning deficits (apraxia or dyspraxia); motor learning deficits; communication deficits (aphasia).

Hold-relax

One PNF technique that Black says can trigger the reflex is commonly called “hold-relax.” This involves:

Putting a muscle in a stretched position and holding for a few seconds.
Contracting the muscle without moving (also called isometric), such as pushing gently against the stretch without actually moving. This is when the reflex is triggered and there is a “6- to 10-second window of opportunity for a beyond ‘normal’ stretch,” Black says.
Relaxing the stretch, and then stretching again while exhaling. This second stretch should be deeper than the first.

Contract-relax

Another common PNF technique is the contract-relax stretch. It is almost identical to hold-relax, except that instead of contracting the muscle without moving, the muscle is contracted while moving. This is sometimes called isotonic stretching.

For example, in a hamstring stretch, this could mean a trainer provides resistance as an athlete contracts the muscle and pushes the leg down to the floor.

Hold-relax-contract

A third technique, hold-relax-contract, is similar to hold-relax, except that after pushing against the stretch, instead of relaxing into a passive stretch, the athlete actively pushes into the stretch.

For example, in a hamstring stretch, this could mean engaging the muscles to raise the leg further, as the trainer pushes in the same direction.

Regardless of technique, PNF stretching can be used on most muscles in the body, according to Black. Stretches can also be modified so you can do them alone or with a partner.

Rhythmic Rotation 

Relaxation is achieved with slow, repeated rotation of a limb at a point where limitation is noticed. As muscles relax the limb is slowly and gently moved into the range. As a new tension is felt, RRo is repeated. The patient can use active movements (voluntary efforts) for RRo or the therapist can perform RRo passively. Voluntary relaxation when possible is important.
Indications Relaxation of excess tension in the muscles (hypertonia) combined with PROM of the range-limiting muscles.

To that end, PNF Techniques have broad applications in treating people with neurologic and musculoskeletal conditions, most frequently in rehabilitating the knee, shoulder, hip and ankle.

PNF PATTERN


  • The PNF exercise patterns involve three components: flexion-extension, abduction-adduction, and internal-external rotation.
  • The patterns mimic a diagonal rotation of the upper extremity, lower extremity, upper trunk, and neck.
  • The pattern activates muscle groups in the lengthened or stretched positions.
  • The upper and lower extremities each have two patterns: D1 and D2 motions targeting flexion and extension.
  • The patterns are used to improve range of motion at the joint as well as introduce resistance training. This will help improve the patients strength.


Upper Extremity 
D1 Flexion 


Starting Position
Shoulder extended, abducted, and internally rotated
Forearm pronated
Wrist ulnarly deviated
Fingers extended

Hand Position
Hand placed in patient's palm so that patient can grip and flex wrist to radial side
hand on the Anterior-medial surface of the patient's arm just above elbow

Movements to End Position
Shoulder flexed, adducted, and externally rotated
Forearm supinated
Wrist radially deviated
Fingers flexed

D1 Extension 


Starting Position
Shoulder flexed, adducted, and externally rotated
Forearm supinated
Wrist radially deviated
Fingers flexed

Hand Position
Hand over dorsal-ulnar aspect of the patient's hand
hand on he posterior-lateral surface of patient's arm just above elbow

Movement to Ending Position
Shoulder extended, abducted, and internally rotated
Forearm pronated
Wrist ulnarly deviated
Fingers extened

D2 Flexion 

Starting Position
Shoulder extended, adducted, and internally rotated
Forearm pronated
Wrist ulnarly deviated
Fingers flexed

Hand Position
Hand over dorsal-ulnar aspect of the patient's hand
Hand on anterior-lateral surface of the patient's arm just above elbow

Movements to End Position
Shoulder flexed, abducted, and externally rotated
Forearm supinated
Wrist radially deviated
Fingers extended

D2 Extension 

Starting Position
Shoulder flexed, abducted, and externally rotated
Forearm supinated
Wrist radially deviated
Fingers extended

Hand Position
Hand placed in the patient's palm so that the patient can grip and flex wrist to the ulnar side
Hand on posterior-medial surface of the patient's arm just above elbow

Moving to Ending Position
Shoulder extended, adducted, and internally rotated
Forearm pronated
Wrist ulnarly deviated
Fingers flexed

Lower Extremity 
D1 Flexion 


Starting Position
Hip extended, abducted, and internally rotated
Ankle plantarflexed
Foot everted
Toes flexed

Hand Position
Hand on distal anterior-medial aspect of thigh
Hand on medial aspect of dorsal surface of foot

Movements to Ending Position
Hip flexed, adducted, and externally rotated
Ankle dorsiflexed
Foot inverted
Toes extended

D1 Extension


Starting Position
Hip flexed, adducted, and externally rotated
Ankle dorsiflexed
Foot inverted
Toes extended

Hand Position
Hand on distal posterior-lateral thigh
Hand on lateral aspect of plantar surface of the foot

Movements to Ending Position
Hip extended, abducted, and internally rotated
Ankle plantarflexed
Foot everted
Toes flexed

D2 Flexion 

Starting Position
Hip extended, adducted, and externally rotated
Ankle plantarflexed
Foot inverted
Toes flexed

Hand Position
Hand on distal anterior-lateral thigh
Hand on lateral aspect of dorsal surface of the foot

Movements to Ending Position
Hip flexed, abducted, and internally rotated
Ankle dorsiflexed
Foot everted
Toes Extended

D2 Extension


Starting Position
Hip flexed, abducted, and internally rotated
Ankle dorsiflexed
Foot everted
Toes Entended

Hand Position
Hand on distal posterior-medial thigh (wrapped around posterior aspect of femur)
Hand on medial aspect of plantar surface of the ball of the foot

Movements to Ending Position :
Hip extended, adducted, and externally rotated
Ankle Plantarflexed
Foot inverted
Toes flexed


Other Physiotherapy Technique Related Article :
               
Rood Approach Details